selenium 主要用于Web应用自动化测试,其主要包含三个部分:WebDriver、Selenium IDE、Grid
WebDriver
WebDriver以原生的方式驱动浏览器,WebDriver通过与浏览器驱动进行通信对话向浏览器传递指令并接收响应结果。
驱动程序是特定于浏览器的,例如 ChromeDriver 对应于谷歌的 Chrome/Chromium, GeckoDriver 对应于 Mozilla 的 Firefox 的,等等。驱动程序在与浏览器相同的系统上运行。
操控浏览器
-
打开网站
// 简便的方法 driver.get("https://selenium.dev"); // 更长的方法 driver.navigate().to("https://selenium.dev"); -
获取当前 URL
driver.getCurrentUrl(); -
后退
driver.navigate().back(); -
前进
driver.navigate().forward(); -
刷新
driver.navigate().refresh(); -
获取标题
driver.getTitle(); -
窗口和标签页
driver.getWindowHandle(); -
切换窗口或标签页
// 存储原始窗口的 ID String originalWindow = driver.getWindowHandle(); // 检查一下,我们还没有打开其他的窗口 assert driver.getWindowHandles().size() == 1; // 点击在新窗口中打开的链接 driver.findElement(By.linkText("new window")).click(); // 等待新窗口或标签页 wait.until(numberOfWindowsToBe(2)); // 循环执行,直到找到一个新的窗口句柄 for (String windowHandle : driver.getWindowHandles()) {if(!originalWindow.contentEquals(windowHandle)) {driver.switchTo().window(windowHandle); break; } } // 等待新标签完成加载内容 wait.until(titleIs("Selenium documentation")); -
创建新窗口(或)新标签页并且切换
// 打开新标签页并切换到新标签页 driver.switchTo().newWindow(WindowType.TAB); // 打开一个新窗口并切换到新窗口 driver.switchTo().newWindow(WindowType.WINDOW); -
关闭窗口或标签页
//关闭标签页或窗口 driver.close(); //切回到之前的标签页或窗口 driver.switchTo().window(originalWindow); -
在会话结束时退出浏览器
driver.quit(); -
Frames and Iframes
<div id="modal"> <iframe id="buttonframe"name="myframe"src="https://seleniumhq.github.io"> <button>Click here</button> </iframe> </div>-
使用 WebElement
// 存储网页元素 WebElement iframe = driver.findElement(By.cssSelector("#modal>iframe")); // 切换到 frame driver.switchTo().frame(iframe); // 现在可以点击按钮 driver.findElement(By.tagName("button")).click(); -
使用 name 或 id
// 使用 ID driver.switchTo().frame("buttonframe"); // 或者使用 name 代替 driver.switchTo().frame("myframe"); // 现在可以点击按钮 driver.findElement(By.tagName("button")).click(); -
使用索引
// 切换到第 2 个框架 driver.switchTo().frame(1); -
离开frames
// 回到顶层
driver.switchTo().defaultContent();
-
-
窗口管理
-
获取窗口大小
// 分别获取每个尺寸 int width = driver.manage().window().getSize().getWidth(); int height = driver.manage().window().getSize().getHeight(); // 或者存储尺寸并在以后查询它们 Dimension size = driver.manage().window().getSize(); int width1 = size.getWidth(); int height1 = size.getHeight(); -
设置窗口大小
driver.manage().window().setSize(new Dimension(1024, 768)); -
得到窗口的位置
// 分别获取每个尺寸 int x = driver.manage().window().getPosition().getX(); int y = driver.manage().window().getPosition().getY(); // 或者存储尺寸并在以后查询它们 Point position = driver.manage().window().getPosition(); int x1 = position.getX(); int y1 = position.getY(); -
设置窗口位置
// 将窗口移动到主显示器的左上角 driver.manage().window().setPosition(new Point(0, 0)); -
最大化窗口
driver.manage().window().maximize(); -
最小化窗口
driver.manage().window().minimize(); -
全屏窗口
driver.manage().window().fullscreen(); -
屏幕截图
import org.apache.commons.io.FileUtils; import org.openqa.selenium.chrome.ChromeDriver; import java.io.*; import org.openqa.selenium.*; public class SeleniumTakeScreenshot { public static void main(String args[]) throws IOException { WebDriver driver = new ChromeDriver(); driver.get("http://www.example.com"); File scrFile = ((TakesScreenshot)driver).getScreenshotAs(OutputType.FILE); FileUtils.copyFile(scrFile, new File("./image.png")); driver.quit(); } } -
元素屏幕截图
import org.apache.commons.io.FileUtils; import org.openqa.selenium.*; import org.openqa.selenium.chrome.ChromeDriver; import java.io.File; import java.io.IOException; public class SeleniumelementTakeScreenshot { public static void main(String args[]) throws IOException { WebDriver driver = new ChromeDriver(); driver.get("https://www.example.com"); WebElement element = driver.findElement(By.cssSelector("h1")); File scrFile = element.getScreenshotAs(OutputType.FILE); FileUtils.copyFile(scrFile, new File("./image.png")); driver.quit(); } } -
执行脚本
//Creating the JavascriptExecutor interface object by Type casting JavascriptExecutor js = (JavascriptExecutor)driver; //Button Element WebElement button =driver.findElement(By.name("btnLogin")); //Executing JavaScript to click on element js.executeScript("arguments[0].click();", button); //Get return value from script String text = (String) js.executeScript("return arguments[0].innerText", button); //Executing JavaScript directly js.executeScript("console.log('hello world')"); -
打印页面
import org.openqa.selenium.print.PrintOptions;

    driver.get("https://www.selenium.dev");
    printer = (PrintsPage) driver;

    PrintOptions printOptions = new PrintOptions();
    printOptions.setPageRanges("1-2");

    Pdf pdf = printer.print(printOptions);
    String content = pdf.getContent();
-
定位元素
定位策略
在 WebDriver 中有 8 种不同的内置元素定位策略:
| 定位 | 描述 |
|---|---|
class name |
定位class属性与搜索值匹配的元素(不允许使用复合类名) |
css selector |
定位 CSS 选择器匹配的元素 |
id |
定位 id 属性与搜索值匹配的元素 |
name |
定位 name 属性与搜索值匹配的元素 |
link text |
定位link text可视文本与搜索值完全匹配的锚元素 |
partial link text |
定位link text可视文本部分与搜索值部分匹配的锚点元素。如果匹配多个元素,则只选择第一个元素。 |
tag name |
定位标签名称与搜索值匹配的元素 |
xpath |
定位与 XPath 表达式匹配的元素 |
相对定位
-
above 元素上
返回当前指定元素位置上方的WebElement对象
import static org.openqa.selenium.support.locators.RelativeLocator.with; WebElement passwordField = driver.findElement(By.id("password")); WebElement emailAddressField = driver.findElement(with(By.tagName("input")) .above(passwordField)); -
below 元素下
返回当前指定元素位置下方的WebElement对象
import static org.openqa.selenium.support.locators.RelativeLocator.with; WebElement emailAddressField = driver.findElement(By.id("email")); WebElement passwordField = driver.findElement(with(By.tagName("input")) .below(emailAddressField)); -
toLeftOf 元素左
返回当前指定元素位置左方的WebElement对象
import static org.openqa.selenium.support.locators.RelativeLocator.with; WebElement submitButton = driver.findElement(By.id("submit")); WebElement cancelButton = driver.findElement(with(By.tagName("button")) .toLeftOf(submitButton)); -
toRightOf 元素右
返回当前指定元素位置右方的WebElement对象
import static org.openqa.selenium.support.locators.RelativeLocator.with; WebElement cancelButton = driver.findElement(By.id("cancel")); WebElement submitButton = driver.findElement(with(By.tagName("button")).toRightOf(cancelButton)); -
near 附近
返回当前指定元素位置附近大约px5050像素的WebElement对象
import static org.openqa.selenium.support.locators.RelativeLocator.with;

WebElement emailAddressLabel = driver.findElement(By.id("lbl-email"));
WebElement emailAddressField = driver.findElement(with(By.tagName("input")).near(emailAddressLabel));
xpath
XPath轴(XPath Axes)可定义某个相对于当前节点的节点集:
-
child
选取当前节点的所有子元素
-
parent
选取当前节点的父节点
-
descendant
选取当前节点的所有后代元素(子、孙等)
-
ancestor
选取当前节点的所有先辈(父、祖父等)
-
descendant-or-self
选取当前节点的所有后代元素(子、孙等)以及当前节点本身
-
ancestor-or-self
选取当前节点的所有先辈(父、祖父等)以及当前节点本身
-
preceding-sibling
选取当前节点之前的所有同级节点
-
following-sibling
选取当前节点之后的所有同级节点
-
preceding
选取文档中当前节点的开始标签之前的所有节点
-
following
选取文档中当前节点的结束标签之后的所有节点
-
self
选取当前节点
-
attribute
选取当前节点的所有属性
-
namespace
选取当前节点的所有命名空间节点
等待
-
显式等待
显示等待 是Selenium客户可以使用的命令式过程语言。它们允许您的代码暂停程序执行,或冻结线程,直到满足通过的 条件 。这个条件会以一定的频率一直被调用,直到等待超时。这意味着只要条件返回一个假值,它就会一直尝试和等待
WebElement foo = new WebDriverWait(driver, Duration.ofSeconds(3)) .until(driver -> driver.findElement(By.name("q"))); assertEquals(foo.getText(), "Hello from JavaScript!"); -
隐式等待
还有第二种区别于显示等待 类型的 隐式等待 。通过隐式等待,WebDriver在试图查找_任何_元素时在一定时间内轮询DOM。当网页上的某些元素不是立即可用并且需要一些时间来加载时是很有用的。
WebDriver driver = new FirefoxDriver();
driver.manage().timeouts().implicitlyWait(10, TimeUnit.SECONDS);
driver.get("http://somedomain/url_that_delays_loading");
WebElement myDynamicElement = driver.findElement(By.id("myDynamicElement"));
警告: 不要混合使用隐式和显式等待。这样做会导致不可预测的等待时间。例如,将隐式等待设置为10秒,将显式等待设置为15秒,可能会导致在20秒后发生超时。
-
流畅等待
流畅等待实例定义了等待条件的最大时间量,以及检查条件的频率。
用户可以配置等待来忽略等待时出现的特定类型的异常,例如在页面上搜索元素时出现的NoSuchElementException。
// Waiting 30 seconds for an element to be present on the page, checking // for its presence once every 5 seconds. Wait<WebDriver> wait = new FluentWait<WebDriver>(driver) .withTimeout(Duration.ofSeconds(30)) .pollingEvery(Duration.ofSeconds(5)) .ignoring(NoSuchElementException.class); WebElement foo = wait.until(new Function<WebDriver, WebElement>() { public WebElement apply(WebDriver driver) { return driver.findElement(By.id("foo")); } }); -
强制等待
Thread.sleep(1000);
JavaScript 警告框,提示框和确认框
-
Alerts 警告框
//Click the link to activate the alert driver.findElement(By.linkText("See an example alert")).click(); //Wait for the alert to be displayed and store it in a variable Alert alert = wait.until(ExpectedConditions.alertIsPresent()); //Store the alert text in a variable String text = alert.getText(); //Press the OK button alert.accept(); -
Confirm 确认框
//Click the link to activate the alert driver.findElement(By.linkText("See a sample confirm")).click(); //Wait for the alert to be displayed wait.until(ExpectedConditions.alertIsPresent()); //Store the alert in a variable Alert alert = driver.switchTo().alert(); //Store the alert in a variable for reuse String text = alert.getText(); //Press the Cancel button alert.dismiss(); -
Prompt 提示框
提示框与确认框相似, 不同之处在于它们还包括文本输入. 与处理表单元素类似, 您可以使用WebDriver的sendKeys来填写响应. 这将完全替换占位符文本. 按下取消按钮将不会提交任何文本
//Click the link to activate the alert
driver.findElement(By.linkText("See a sample prompt")).click();

//Wait for the alert to be displayed and store it in a variable
Alert alert = wait.until(ExpectedConditions.alertIsPresent());

//Type your message
alert.sendKeys("Selenium");

//Press the OK button
alert.accept();
Http 代理
使用代理服务器用于Selenium的自动化脚本, 可能对以下方面有益:
-
捕获网络流量
-
模拟网站后端响应
-
在复杂的网络拓扑结构或严格的公司限制/政策下访问目标站点.
import org.openqa.selenium.Proxy;
import org.openqa.selenium.WebDriver;
import org.openqa.selenium.chrome.ChromeDriver;
import org.openqa.selenium.chrome.ChromeOptions;

public class proxyTest {
  public static void main(String[] args) {
    Proxy proxy = new Proxy();
    proxy.setHttpProxy("<HOST:PORT>");
    ChromeOptions options = new ChromeOptions();
    options.setCapability("proxy", proxy);
    WebDriver driver = new ChromeDriver(options);
    driver.get("https://www.google.com/");
    driver.manage().window().maximize();
    driver.quit();
  }
}
页面加载策略
-
normal
此配置使Selenium WebDriver等待整个页面的加载. 设置为 normal 时, Selenium WebDriver将保持等待, 直到 返回 load 事件
默认情况下, 如果未设置页面加载策略, 则设置 normal 为初始策略.
import org.openqa.selenium.PageLoadStrategy; import org.openqa.selenium.WebDriver; import org.openqa.selenium.chrome.ChromeOptions; import org.openqa.selenium.chrome.ChromeDriver; public class pageLoadStrategy { public static void main(String[] args) { ChromeOptions chromeOptions = new ChromeOptions(); chromeOptions.setPageLoadStrategy(PageLoadStrategy.NORMAL); WebDriver driver = new ChromeDriver(chromeOptions); try { // Navigate to Url driver.get("https://google.com"); } finally { driver.quit(); } } } -
eager
这将使Selenium WebDriver保持等待, 直到完全加载并解析了HTML文档, 该策略无关样式表, 图片和subframes的加载.
设置为 eager 时, Selenium WebDriver保持等待, 直至返回 DOMContentLoaded 事件.
import org.openqa.selenium.PageLoadStrategy; import org.openqa.selenium.WebDriver; import org.openqa.selenium.chrome.ChromeOptions; import org.openqa.selenium.chrome.ChromeDriver; public class pageLoadStrategy { public static void main(String[] args) { ChromeOptions chromeOptions = new ChromeOptions(); chromeOptions.setPageLoadStrategy(PageLoadStrategy.EAGER); WebDriver driver = new ChromeDriver(chromeOptions); try { // Navigate to Url driver.get("https://google.com"); } finally { driver.quit(); } } } -
none
设置为 none 时, Selenium WebDriver仅等待至初始页面下载完成.
import org.openqa.selenium.PageLoadStrategy;
import org.openqa.selenium.WebDriver;
import org.openqa.selenium.chrome.ChromeOptions;
import org.openqa.selenium.chrome.ChromeDriver;

public class pageLoadStrategy {
    public static void main(String[] args) {
        ChromeOptions chromeOptions = new ChromeOptions();
        chromeOptions.setPageLoadStrategy(PageLoadStrategy.NONE);
        WebDriver driver = new ChromeDriver(chromeOptions);
        try {
            // Navigate to Url
            driver.get("https://google.com");
        } finally {
            driver.quit();
        }
    }
}
WebElement
-
Find Element
WebDriver driver = new FirefoxDriver(); driver.get("http://www.google.com"); // Get search box element from webElement 'q' using Find Element WebElement searchBox = driver.findElement(By.name("q")); searchBox.sendKeys("webdriver"); -
Find Elements
import org.openqa.selenium.By; import org.openqa.selenium.WebDriver; import org.openqa.selenium.WebElement; import org.openqa.selenium.firefox.FirefoxDriver; import java.util.List; public class findElementsExample { public static void main(String[] args) { WebDriver driver = new FirefoxDriver(); try { driver.get("https://example.com"); // Get all the elements available with tag name 'p' List<WebElement> elements = driver.findElements(By.tagName("p")); for (WebElement element : elements) { System.out.println("Paragraph text:" + element.getText()); } } finally { driver.quit(); } } } -
Find Element From Element
WebDriver driver = new FirefoxDriver(); driver.get("http://www.google.com"); WebElement searchForm = driver.findElement(By.tagName("form")); WebElement searchBox = searchForm.findElement(By.name("q")); searchBox.sendKeys("webdriver"); -
Find Elements From Element
import org.openqa.selenium.By; import org.openqa.selenium.WebDriver; import org.openqa.selenium.WebElement; import org.openqa.selenium.chrome.ChromeDriver; import java.util.List; public class findElementsFromElement { public static void main(String[] args) { WebDriver driver = new ChromeDriver(); try { driver.get("https://example.com"); // Get element with tag name 'div' WebElement element = driver.findElement(By.tagName("div")); // Get all the elements available with tag name 'p' List<WebElement> elements = element.findElements(By.tagName("p")); for (WebElement e : elements) { System.out.println(e.getText()); } } finally { driver.quit(); } } } -
Get Active Element
此方法用于追溯或查找当前页面上下文中具有焦点的DOM元素.
import org.openqa.selenium.*; import org.openqa.selenium.chrome.ChromeDriver; public class activeElementTest { public static void main(String[] args) { WebDriver driver = new ChromeDriver(); try { driver.get("http://www.google.com"); driver.findElement(By.cssSelector("[name='q']")).sendKeys("webElement"); // Get attribute of current active element String attr = driver.switchTo().activeElement().getAttribute("title"); System.out.println(attr); } finally { driver.quit(); } } } -
Is Element Enabled
此方法用于检查网页上连接的元素是否被启用或禁用. 返回一个布尔值, 如果在当前浏览上下文中启用了连接的元素, 则返回True; 否则返回false .
//navigates to url driver.get("https://www.google.com/"); //returns true if element is enabled else returns false boolean value = driver.findElement(By.name("btnK")).isEnabled(); -
Is Element Selected
此方法确定是否 已选择 引用的元素. 此方法广泛用于复选框, 单选按钮, 输入元素和选项元素.
返回一个布尔值, 如果在当前浏览上下文中 已选择 引用的元素, 则返回 True, 否则返回 False.
//navigates to url driver.get("https://the-internet.herokuapp.com/checkboxes"); //returns true if element is checked else returns false boolean value = driver.findElement(By.cssSelector("input[type='checkbox']:first-of-type")).isSelected(); -
Get Element TagName
此方法用于获取在当前浏览上下文中 具有焦点的被引用元素的 TagName .
//navigates to url driver.get("https://www.example.com"); //returns TagName of the element String value = driver.findElement(By.cssSelector("h1")).getTagName(); -
Get Element Rect
用于获取参考元素的尺寸和坐标.
提取的数据主体包含以下详细信息:
-
元素左上角的X轴位置
-
元素左上角的y轴位置
-
元素的高度
-
元素宽度
// Navigate to url
driver.get("https://www.example.com");

// Returns height, width, x and y coordinates referenced element
Rectangle res =  driver.findElement(By.cssSelector("h1")).getRect();

// Rectangle class provides getX,getY, getWidth, getHeight methods
System.out.println(res.getX());
-
-
获取元素CSS值
// Navigate to Url driver.get("https://www.example.com"); // Retrieves the computed style property 'color' of linktext String cssValue = driver.findElement(By.linkText("More information...")).getCssValue("color"); -
获取元素文本
// Navigate to url
driver.get("https://example.com");

// Retrieves the text of the element
String text = driver.findElement(By.cssSelector("h1")).getText();
Keyboard 键盘事件
-
sendKeys
import org.openqa.selenium.By; import org.openqa.selenium.Keys; import org.openqa.selenium.WebDriver; import org.openqa.selenium.firefox.FirefoxDriver; public class HelloSelenium { public static void main(String[] args) { WebDriver driver = new FirefoxDriver(); try { // Navigate to Url driver.get("https://google.com"); // Enter text "q" and perform keyboard action "Enter" driver.findElement(By.name("q")).sendKeys("q" + Keys.ENTER); } finally { driver.quit(); } } } -
keyDown
keyDown用于模拟按下辅助按键(CONTROL, SHIFT, ALT)的动作.
WebDriver driver = new ChromeDriver(); try { // Navigate to Url driver.get("https://google.com"); // Enter "webdriver" text and perform "ENTER" keyboard action driver.findElement(By.name("q")).sendKeys("webdriver" + Keys.ENTER); Actions actionProvider = new Actions(driver); Action keydown = actionProvider.keyDown(Keys.CONTROL).sendKeys("a").build(); keydown.perform(); } finally { driver.quit(); } -
keyUp
keyUp用于模拟辅助按键(CONTROL, SHIFT, ALT)弹起或释放的操作.
import org.openqa.selenium.By; import org.openqa.selenium.Keys; import org.openqa.selenium.WebDriver; import org.openqa.selenium.WebElement; import org.openqa.selenium.firefox.FirefoxDriver; import org.openqa.selenium.interactions.Actions; public class HelloSelenium { public static void main(String[] args) { WebDriver driver = new FirefoxDriver(); try { // Navigate to Url driver.get("https://google.com"); Actions action = new Actions(driver); // Store google search box WebElement WebElement search = driver.findElement(By.name("q")); // Enters text "qwerty" with keyDown SHIFT key and after keyUp SHIFT key (QWERTYqwerty) action.keyDown(Keys.SHIFT).sendKeys(search,"qwerty").keyUp(Keys.SHIFT).sendKeys("qwerty").perform(); } finally { driver.quit(); } } } -
clear
清除可编辑元素的内容. 这仅适用于可编辑且可交互的元素, 否则Selenium将返回错误(无效的元素状态或元素不可交互).
import org.openqa.selenium.By;
import org.openqa.selenium.WebDriver;
import org.openqa.selenium.WebElement;
import org.openqa.selenium.chrome.ChromeDriver;

public class clear {
  public static void main(String[] args) {
    WebDriver driver = new ChromeDriver();
    try {
      // Navigate to Url
      driver.get("https://www.google.com");
      // Store 'SearchInput' element
      WebElement searchInput = driver.findElement(By.name("q"));
      searchInput.sendKeys("selenium");
      // Clears the entered text
      searchInput.clear();
    } finally {
      driver.quit();
    }
  }
}
鼠标事件
proform()
调用ActionChains类方法时,不会立即执行,而是将所有操作都存放在一个队列里,当调用perform()方法时,队列里的操作会依次执行。可以理解为对鼠标事件的提交操作,所以首先要记住这个方法。
事件
-
click 单击鼠标左键
-
clickAndHold 点击鼠标左键,不松开
-
contextClick 点击鼠标右键
-
doubleClick 双击鼠标左键
-
dragAndDrop(source, target) 拖拽到某个元素然后松开
-
dragAndDropByOffset(source, xoffset, yoffset) 拖拽到某个坐标然后松开
-
moveByOffset(xoffset, yoffset) 鼠标从当前位置移动到某个坐标
-
moveToElement(element) 鼠标移动到某个元素
-
moveToElementWithOffset(to_element, xoffset, yoffset) 移动到距某个元素(左上角坐标)多少距离的位置
-
release 在某个元素位置松开鼠标左键
Remote WebDriver
FirefoxOptions firefoxOptions = new FirefoxOptions();
WebDriver driver = new RemoteWebDriver(new URL("http://www.example.com"), firefoxOptions);
driver.get("http://www.google.com");
driver.quit();-
浏览器选项
ChromeOptions chromeOptions = new ChromeOptions(); chromeOptions.setCapability("browserVersion", "67"); chromeOptions.setCapability("platformName", "Windows XP"); WebDriver driver = new RemoteWebDriver(new URL("http://www.example.com"), chromeOptions); driver.get("http://www.google.com"); driver.quit(); -
本地文件检测器
本地文件检测器允许将文件从客户端计算机传输到远程服务器. 例如, 如果测试需要将文件上传到Web应用程序, 则远程WebDriver可以在运行时 将文件从本地计算机自动传输到远程Web服务器. 这允许从运行测试的远程计算机上载文件. 默认情况下未启用它, 可以通过以下方式启用:
driver.setFileDetector(new LocalFileDetector());定义上述代码后, 您可以通过以下方式在测试中上传文件:
driver.get("http://sso.dev.saucelabs.com/test/guinea-file-upload");
WebElement upload = driver.findElement(By.id("myfile"));
upload.sendKeys("/Users/sso/the/local/path/to/darkbulb.jpg");
Selenium IDE
Selenium IDE可以方便的录制和管理测试用例,可以通过浏览器插件运行或者命令行运行,并且支持导出java和Python等语言代码(java基于junit生成代码)。
Grid
通过将客户端命令发送到远程浏览器的实例, Selenium Grid 允许在远程计算机 (虚拟或真实) 上执行WebDriver脚本. 它旨在提供一种在多台计算机上并行运行测试的简便方法.
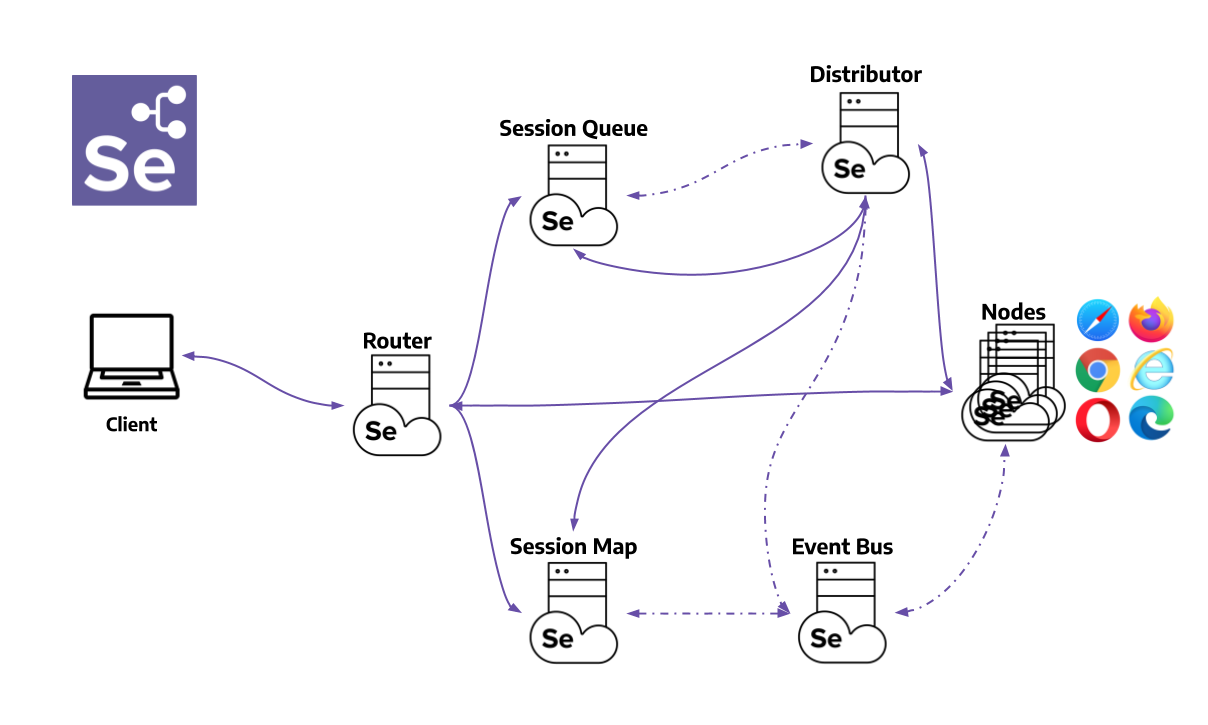
Grid组成
-
Router
路由负责将请求转发到正确的组件.
它是Grid的入口点, 所有外部请求都将由其接收. 路由的行为因请求而异. 当请求一个新的会话时, 路由将把它添加到新的会话队列中. 分发器定期检查是否有空闲槽. 若有, 则从新会话队列中删除第一个匹配请求. 如果请求属于存量会话, 这个路由将会话id发送到会话表, 会话表将返回正在运行会话的节点. 在此之后, 路由将 将请求转发到节点.
为了更好地发挥效力, 路由通过将请求发送到组件的方式, 来平衡Grid的负载, 从而使处理过程中不会有任何的过载组件.
-
Distributor
分发器知道所有节点及其功能. 它的主要作用是接收新的会话请求 并找到可以在其中创建会话的适当节点. 创建会话后, 分发器在会话集合中存储会话ID与正在执行会话的节点之间的关系.
-
Node
一个节点可以在网格中出现多次. 每个节点负责管理其运行机器的可用浏览器的插槽.
节点通过事件总线将其自身注册到分发服务器, 并且将其配置作为注册消息的组成部分一起发送.
默认情况下, 节点自动注册其运行机器路径上的 所有可用浏览器驱动程序. 它还为基于Chromium的浏览器和Firefox的 每个可用CPU创建一个插槽. 对于Safari和Internet Explorer, 只创建一个插槽. 通过特定的配置, 它可以在Docker容器或中继命令中运行会话. 您可以在下一 章节 中看到更多配置详细信息.
节点仅执行接收到的命令, 它不进行评估、做出判断或控制任何事情. 运行节点的计算机不需要与其他组件具有相同的操作系统. 例如, Windows节点可以具有将Internet Explorer作为浏览器选项的功能, 而在Linux或Mac上则无法实现
-
Session Map
会话表是一种数据存储的方式, 用于保存会话id和会话运行的节点的信息. 它作为路由支持, 在向节点转发请求的过程中起作用. 路由将通过会话表获取与会话id关联的节点.
-
New Session Queue
新会话队列以先进先出的顺序保存所有新会话请求. 其具有用于设置请求超时和请求重试间隔的可配置参数.
路由将新会话请求添加到新会话队列并等待响应. 新会话队列定期检查队列中的任何请求是否已超时, 若有,则请求将被拒绝并立即删除.
分发器定期检查是否有可用槽. 若有, 分发器将为第一个匹配的请求索取新会话队列. 然后分发器会尝试创建新的会话.
一旦请求的功能与任何空闲节点槽匹配, 分发器将尝试获取可用槽. 如果没有空闲槽, 分发器会要求队列将请求添加到队列前面. 如果请求在重试或添加到队列头时超时, 则该请求将被拒绝.
成功创建会话后, 分发器将会话信息发送到新会话队列. 新会话队列将响应发送回客户端
-
Event Bus
事件总线充当节点、分发服务器、新的会话队列器和会话表之间的通信路径. 网格通过消息进行大部分内部通信, 避免了昂贵的HTTP调用. 当以完全分布式模式启动网格时, 事件总线是应该启动的第一个组件
Grid运行
-
独立运行
独立运行是指一个服务包含了所有的Grid组件
java -jar selenium-server-<version>.jar standalone独立也是启动 Selenium Grid 的最简单模式。默认情况下,服务器将侦听http://localhost:4444,这是您应该指向RemoteWebDriver测试的 URL 。服务器将从系统中检测它可以使用的可用驱动程序PATH。
-
hub和nodes方式
hub是以下组件的集合:
-
Router
-
Distributor
-
Session Map
-
New Session Queue
-
Event Bus
java -jar selenium-server-<version>.jar hub默认情况下,服务器将侦听http://localhost:4444,这是您应该指向RemoteWebDriver测试的 URL 。
在此设置中可以启动一个或多个节点,服务器将从系统中检测它可以使用的可用驱动程序PATH。
java -jar selenium-server-<version>.jar node
-
-
分布式部署
在分布式模式下,每个组件都需要自己启动。这种设置更适合大型Grid。
组件的启动顺序并不重要,但是,我们建议在启动分布式网格时遵循这些步骤:
-
事件总线:作为后续步骤中其他 Grid 组件的通信路径。
java -jar selenium-server-<version>.jar event-bus -
会话映射:负责将会话 ID 映射到运行会话的节点。
java -jar selenium-server-<version>.jar sessions -
New Session Queue:将新的会话请求加入到队列中,由分发器处理。
java -jar selenium-server-<version>.jar sessionqueue -
Distributor:节点向其注册,并为会话请求分配一个节点。
java -jar selenium-server-<version>.jar distributor --sessions http://localhost:5556 --sessionqueue http://localhost:5559 --bind-bus false -
Router:Grid 入口点,负责将请求重定向到正确的组件。
java -jar selenium-server-<version>.jar router --sessions http://localhost:5556 --distributor http://localhost:5553 --sessionqueue http://localhost:5559 -
节点
java -jar selenium-server-<version>.jar node
-
-
检查Grid状态
-
可以通过打开首选浏览器并转到http://localhost:4444来访问网格 UI 。
-
API 调用可以通过http://localhost:4444/status 端点或使用 GraphQL 完成:
curl -X POST -H "Content-Type: application/json" --data '{ "query": "{grid{uri}}" }' -s http://localhost:4444/graphql | jq .
-